
Newborn Lighting: The Complete Guide for Perfect Photos
When you hold your newborn for the first time, you want to freeze that moment forever. The tiny fingers, the soft skin, those peaceful sleeping expressions deserve to be captured in photographs that truly do them justice. But here’s what many parents don’t realize: the difference between a snapshot and a breathtaking portrait often comes down to one critical element. Newborn lighting isn’t just about making sure your baby is visible in the photo. It’s about creating depth, highlighting those precious details, and ensuring your little one looks as angelic in pictures as they do in your arms.
Understanding Why Newborn Lighting Matters
The way light falls on your baby’s face can completely transform a photograph. Harsh, direct light creates unflattering shadows and can wash out your newborn’s delicate features. Meanwhile, soft, diffused light wraps around those chubby cheeks and tiny nose, creating dimension while maintaining that dreamy, ethereal quality every parent wants.
Professional photographers understand these key principles:
- Light quality matters more than light quantity
- Direction determines where shadows fall and features are emphasized
- Color temperature affects skin tones and overall mood
- Consistency creates a cohesive gallery of images
Your baby’s skin is incredibly sensitive, and their eyes are still adjusting to the world outside the womb. Safety considerations for newborn photography emphasize using gentle, non-invasive lighting that won’t startle or harm your little one. This means never using direct flash pointed at your baby and always prioritizing their comfort over getting the perfect shot.
Natural Light: Your First and Best Option
There’s a reason why natural daylight remains the gold standard for newborn photography. Window light provides soft, flattering illumination that’s naturally diffused and gentle on sensitive eyes. When positioned correctly, it creates beautiful depth and dimension without any premium equipment.
Finding the Perfect Window
Not all windows are created equal for photography purposes. North-facing windows provide consistent, indirect light throughout the day, making them ideal for newborn sessions. South-facing windows can work beautifully but may require additional diffusion during midday when the sun is strongest.
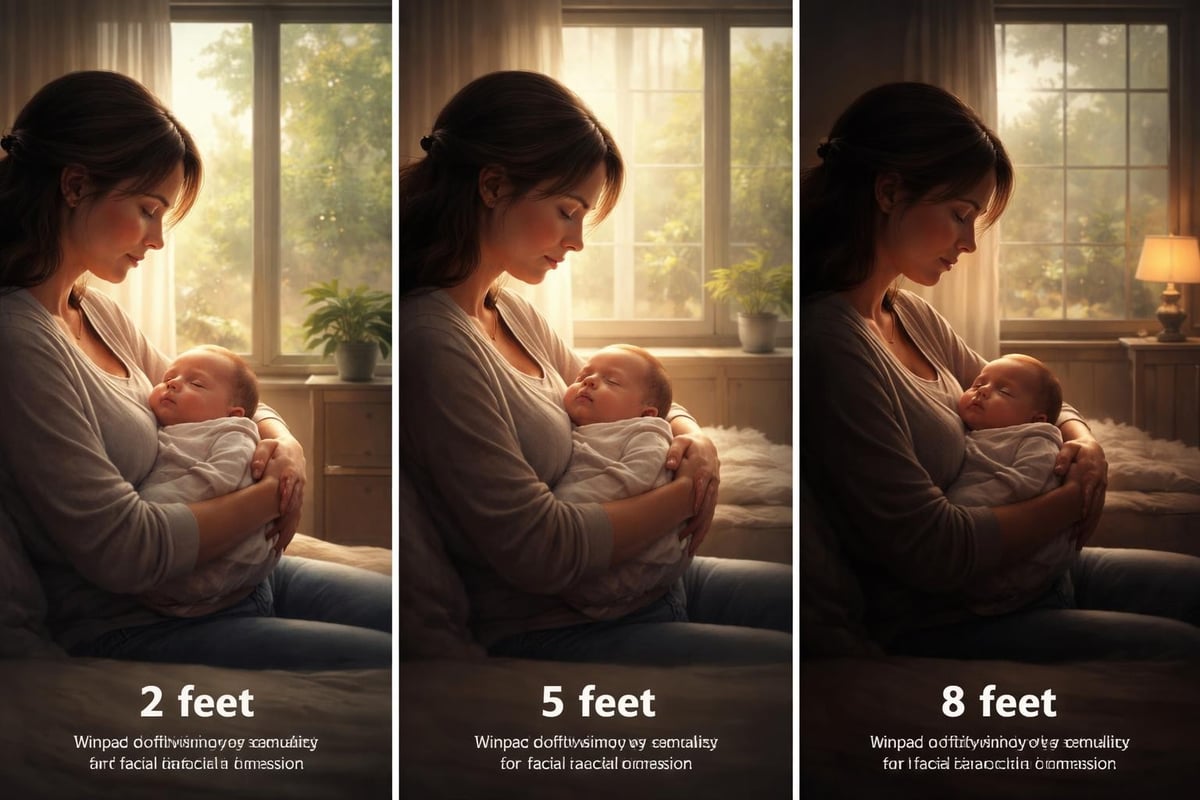
The distance between your baby and the window dramatically impacts the lighting effect. Positioning your newborn three to six feet from the window typically creates that soft, wraparound light that professional photographers love. Too close, and you’ll get harsh contrasts. Too far, and the light becomes flat and uninteresting.
Working With Changing Light Conditions
Natural light changes throughout the day, and understanding these variations helps you plan your session timing. The golden hours just after sunrise and before sunset provide warm, soft light that’s incredibly flattering. However, these times often don’t align with your newborn’s best sleeping windows.
Overcast days are actually a newborn photographer’s secret weapon. Cloud cover acts as nature’s softbox, creating beautifully even, diffused light that’s nearly impossible to replicate artificially. If you’re planning a home session, don’t reschedule just because it’s cloudy.
Studio Lighting Techniques for Consistent Results
While natural light is beautiful, it’s not always reliable or sufficient. Professional studios use controlled lighting to ensure consistent, stunning results regardless of weather, time of day, or available windows. Understanding these techniques helps you appreciate the artistry behind newborn photography.
| Lighting Setup | Best For | Key Benefit | Consideration |
|---|---|---|---|
| Single Softbox | Classic portraits | Simple, natural look | Requires careful positioning |
| Two-light Setup | Full-body shots | Even illumination | More complex to balance |
| Rembrandt Style | Artistic portraits | Dramatic depth | May be too contrasty for some |
| Butterfly Pattern | Face-forward poses | Flattering facial features | Limited pose flexibility |
The beginner’s guide to studio lighting emphasizes starting with a single light source. This approach creates depth through shadow and highlight, preventing the flat, dimensionless look that multiple lights sometimes create.
The Power of Softboxes and Diffusion
Softboxes work by spreading light over a larger surface area, which naturally softens shadows and reduces harsh contrasts. The larger the light source relative to your subject, the softer the light becomes. For newborns, using a large softbox positioned close creates that coveted wrap-around effect.
Umbrellas provide another excellent diffusion option. Shoot-through umbrellas place the fabric between the light and your baby, spreading and softening the illumination. Reflective umbrellas bounce light back toward your subject, offering slightly more control over direction.
Key factors in choosing diffusion:
- Size of the modifier relative to your baby
- Distance from the light to your subject
- Material density and light transmission
- Ease of positioning in tight spaces
Advanced Lighting Patterns and Positions
Professional newborn photographers use specific lighting patterns that have been refined over decades of portrait work. These aren’t arbitrary positions but rather carefully calculated angles that flatter the human face, even one just days old.
Rembrandt lighting techniques create a small triangle of light on the shadowed cheek, adding dimension and interest to portraits. For newborns, this dramatic approach works beautifully for artistic black and white images but may be too pronounced for some parents’ preferences.
Butterfly Lighting for Angelic Portraits
Butterfly lighting, named for the small butterfly-shaped shadow it creates under the nose, positions the main light directly in front of and slightly above your baby’s face. This pattern is particularly flattering for newborns because it emphasizes those round cheeks while minimizing any small blemishes or newborn skin variations.
The key is keeping the light high enough to create that signature shadow without making it too pronounced. For sleeping newborns, this usually means positioning the light at roughly a 30-degree angle from horizontal.
Loop Lighting for Natural Dimension
Loop lighting creates a small shadow from the nose that loops down toward the corner of the mouth. This slightly off-center approach feels more natural and three-dimensional than butterfly lighting while remaining soft and flattering.
To achieve loop lighting, position your main light at approximately 30-45 degrees to the side of your baby and slightly above eye level. The exact angle depends on your newborn’s facial structure and the specific look you’re trying to achieve.
Using Reflectors and Fill Light Strategically
Reflectors are often overlooked but incredibly powerful tools in newborn lighting. They bounce existing light back toward your baby, filling in shadows and creating a more balanced exposure. Strategic use of reflectors can eliminate the need for additional light sources while maintaining that soft, natural quality.
White reflectors provide subtle fill that maintains the existing color temperature. Silver reflectors add slightly more punch and can cool the light tone slightly. Gold reflectors warm the skin tones, creating that sun-kissed glow many parents love.
Positioning Fill Light Effectively
When natural light or your main light source creates shadows that are too deep, fill light brings detail back into those darker areas. The goal isn’t to eliminate shadows entirely but rather to control the contrast ratio between highlights and shadows.
Effective fill light placement follows these guidelines:
- Position opposite your main light source
- Keep fill light lower in intensity (about half power)
- Angle slightly upward to avoid creating competing shadows
- Use diffusion to match the quality of your main light
Some photographers prefer using a second light source for fill, while others rely exclusively on reflectors. Both approaches work beautifully for newborns when implemented with care and attention to the overall lighting balance.
Color Temperature and White Balance Considerations
Newborn lighting isn’t just about direction and intensity-color temperature plays a crucial role in how your baby’s skin tones render in photographs. Mixed lighting sources with different color temperatures can create unflattering color casts that are difficult to correct in post-processing.
Daylight measures around 5500K on the Kelvin scale and is considered neutral. Indoor tungsten bulbs typically measure around 3200K, creating warm, orange-toned light. When you combine natural light with studio lighting, matching color temperatures ensures consistent skin tones throughout your gallery.
| Light Source | Color Temperature | Effect on Skin Tones | Best Use Case |
|---|---|---|---|
| Direct Sunlight | 5500K | Neutral, true-to-life | Outdoor sessions |
| Overcast Sky | 6500K | Slightly cool, blue | Indoor near windows |
| Tungsten Bulbs | 3200K | Warm, yellow-orange | Evening ambiance |
| LED Panels | 3200-5600K (variable) | Adjustable | Studio control |
Professional photographers often use LED lights with adjustable color temperature, allowing them to match existing ambient light or create specific moods. This flexibility is particularly valuable when working in clients’ homes where controlling existing light sources isn’t always possible.
Safety-First Lighting Approaches
Your newborn’s safety should always take precedence over any photographic consideration. Essential safety guidelines emphasize keeping all lighting equipment secure, maintaining appropriate distances, and monitoring your baby’s temperature throughout the session.
Continuous lights (LED panels and traditional bulbs) generate heat that can quickly make a newborn uncomfortable. Position these lights far enough away that your baby doesn’t overheat, and take frequent breaks to allow both your little one and the environment to cool down.
Flash vs. Continuous Light for Newborns
The debate between flash and continuous lighting for newborn sessions has passionate advocates on both sides. Flash doesn’t generate ongoing heat and won’t disturb a sleeping baby with bright light during posing. However, it requires more technical knowledge and doesn’t allow you to preview exactly how your lighting will look.
Continuous lighting lets you see precisely how light falls on your baby before taking the photo. This makes learning and adjusting easier, especially for parents attempting their own newborn photography. The tradeoff is heat generation and the potential for bright light to wake or disturb your little one.
Most professional newborn photographers have moved toward continuous LED lighting that’s specifically designed to minimize heat output while providing sufficient illumination. These premium light panels offer the best of both worlds: preview capability without excessive heat.
Practical Lighting Tips for Home Sessions
Not everyone has access to a professional studio, and some of the most beautiful newborn portraits happen in the comfort of home. Perfect lighting can be achieved in almost any space with thoughtful preparation and basic equipment.
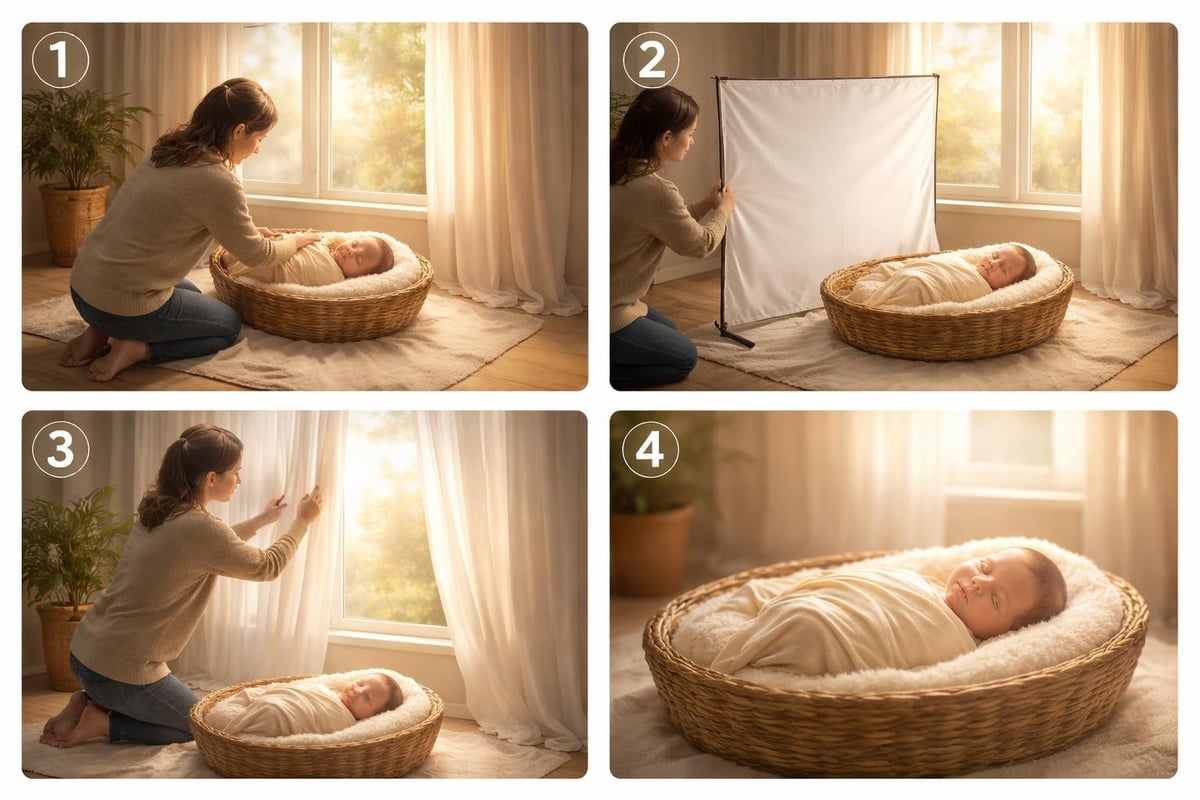
Transform your home into a photography space:
- Clear space near your largest window
- Use white bedsheets as makeshift reflectors
- Hang sheer curtains for instant light diffusion
- Schedule sessions during optimal natural light hours
- Turn off overhead lights that create competing color temperatures
The master bedroom often makes an ideal newborn photography location because it typically has good window light and space to work. Living rooms can work equally well, particularly those with large windows or sliding glass doors.
Lighting Different Poses and Setups
Your lighting approach should adapt based on whether you’re photographing your newborn in a basket, on a beanbag, wrapped in parents’ arms, or in any of the countless adorable poses that newborn photographers create. Each setup presents unique lighting challenges and opportunities.
Overhead poses like the “froggy” position require light coming from above to properly illuminate your baby’s face. Side-lit setups work beautifully when your newborn is positioned in profile. Understanding how light direction interacts with pose helps you achieve consistently beautiful results.
Lighting for Parent and Sibling Shots
When incorporating parents or siblings into newborn portraits, your lighting needs expand beyond just your baby. The goal is creating flattering illumination for everyone in the frame while maintaining focus on your newborn.
Positioning everyone at similar distances from your main light source helps ensure even illumination. If family members are significantly larger than your tiny newborn, you may need to adjust light height or angle to prevent shadowing.
Modifying Light for Creative Effects
Once you understand foundational newborn lighting principles, you can experiment with creative modifications that add artistic flair to your portraits. Barn doors, grids, and snoots allow you to control light spread and create spotlight effects that draw the eye exactly where you want it.
Backlighting creates a beautiful rim of light around your baby’s head and body, separating them from the background and adding dimension. This technique works particularly well for silhouette-style images or when you want to emphasize your newborn’s delicate hair and soft body contours.
Creative lighting modifications include:
- Hair light to add separation and highlight detail
- Background light to control tone and depth
- Gradient lighting for artistic shadowing effects
- Colored gels for unique mood creation (use sparingly)
Controlling light quality through various modifiers opens up endless creative possibilities while maintaining the soft, gentle approach that newborn photography requires.
Troubleshooting Common Lighting Challenges
Even with solid understanding and good equipment, lighting challenges arise during newborn sessions. Knowing how to quickly identify and solve these issues keeps your session flowing smoothly and your baby comfortable.
Harsh shadows typically indicate your light source is too small relative to your subject or positioned at an unflattering angle. Moving your light closer, using a larger modifier, or adding fill light usually resolves this issue.
Flat lighting that lacks dimension suggests you’re using too much fill light or positioning your main light too close to your camera position. Creating more separation between light and camera adds the depth that makes portraits interesting.
Dealing With Mixed Lighting Sources
Room lights, windows from multiple directions, and various light fixtures create mixed color temperatures that result in strange color casts. The solution is either turning off all competing light sources or using gels to match your artificial lights to ambient temperature.
When shooting near windows, be aware of reflected light from colored walls, carpets, or outdoor elements like grass. These can introduce subtle color casts that affect skin tones. White or neutral-colored surfaces near your photography space help maintain clean, accurate colors.
Equipment Recommendations for Different Budgets
You don’t need thousands of dollars in lighting equipment to create beautiful newborn portraits. Starting with natural light and basic reflectors can produce stunning results, while premium studio setups offer additional control and consistency.
| Budget Level | Essential Equipment | Optional Additions | Approximate Investment |
|---|---|---|---|
| Minimal | Reflector, window | Sheer curtains | $20-50 |
| Basic | LED panel, reflector, diffusion | Second LED panel | $150-300 |
| Intermediate | Two LED panels, softbox, reflectors | Light stand accessories | $400-800 |
| Professional | Multiple strobes/LEDs, various modifiers | Backup equipment, specialty tools | $1500+ |
Quality matters more than quantity when building your lighting kit. A single excellent light source with proper diffusion creates better results than multiple inferior lights. Invest in tools you’ll actually use rather than accumulating equipment that sits unused.
Learning to See Light Like a Professional
Understanding technical aspects of newborn lighting is important, but developing your eye for light quality, direction, and effect is equally crucial. Professional photographers train themselves to notice subtle differences in how light falls and shapes their subjects.
Practice by observing light throughout your daily life. Notice how morning light through your kitchen window differs from afternoon light in your living room. Observe how light wraps around objects, where shadows fall, and how different surfaces reflect and absorb illumination.
Exercises for developing lighting awareness:
- Photograph the same subject at different times of day
- Move a single light source around your subject, noting changes
- Compare images shot with various modifier sizes
- Study professional newborn galleries, identifying lighting patterns
- Experiment with reflector positions and observe the differences
This observational practice translates directly into better decision-making during newborn sessions. You’ll instinctively know where to position your baby for optimal light and how to modify illumination to achieve your desired look.
Working With Your Photographer’s Lighting Style
If you’re planning a professional newborn session rather than photographing your own baby, understanding newborn lighting helps you communicate effectively with your photographer and appreciate the artistry in your final images.
Different photographers develop signature lighting styles that become part of their artistic identity. Some prefer bright and airy with minimal shadows, while others embrace more dramatic lighting with deeper contrasts. Reviewing a photographer’s portfolio shows you their lighting preferences and helps ensure their style matches your vision.
Don’t hesitate to discuss lighting during your consultation. Ask about their approach, what equipment they use, and how they ensure your baby’s comfort during the session. A photographer who takes time to explain their process and address your concerns demonstrates the professionalism you want for such precious portraits.
Mastering newborn lighting transforms ordinary snapshots into heirloom-quality portraits that capture this fleeting stage in all its precious detail. Whether you’re working with natural window light at home or professional studio equipment, the principles remain the same: soft, gentle illumination that flatters your baby’s delicate features while ensuring their complete safety and comfort. If you’re expecting or have recently welcomed your little one and want portraits that truly showcase this magical time, One Big Happy Photo, LLC specializes in creating custom newborn photography experiences throughout Connecticut, New York, and Massachusetts, with expert lighting techniques that ensure every detail of your baby’s first days is preserved beautifully.